Content feed Comments Feed

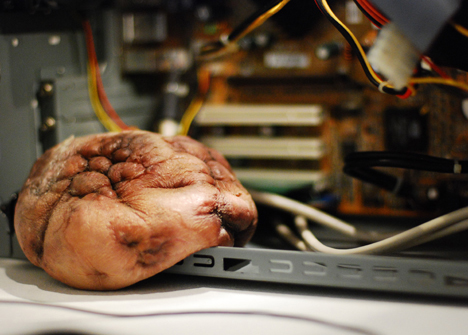
Mechanical tumor, external heart, elastic cell - CPU Load Meter

Interactive media artist Mio I-zawa’s “mechanical tumor” is a quivering hunk of fleshy, organic-looking material that expands and contracts depending on the amount of stress your computer is experiencing ....
Your Ad Here

Dell Latitude Z: 16-inch notebook weighs 4.5 pounds, charges wirelessly

Dell’s got something for the business set today in the 16-inch Latitude Z, a $2000 notebook that measures just over half an inch thick, weighs 4.5 pounds, and charges wirelessly ....
Your Ad Here

The Very First Lighter Phone SB6309

Although I fully admit to chuckling quite a bit after first seeing this cellphone with a built-in cigarette lighter, I can see some practicality with it. After all, I can’t tell you how many times I’ve heard of my smoking friends losing their lighter. I’ve been asked numerous times if I happen to have a lighter on me, despite that they’re fully aware I don’t smoke. Having a lighter built into your cellphone would come in incredibly handy. After all, your phone is almost always somewhere within reach.....
Your Ad Here

How to take Screenshots using VLC Media Player

This tutorial will teach you how to take Screenshots from the Movie using VLC Media Player


1. You need VLC Player if you don’t have it already, you download it from here:

2. Once it’s installed open a movie with VLC Player.

-Before we go further,go to VLC –> Tools –> Option –> On left side click on “Video”

How to take Screenshots using VLC Media Player

And choose where you want to save your screenshots, so you can find them, like mine is Desktop.

3. Now find the good scene on the movie and Pause it.

Go to Video –> Snapshot

How to take Screenshots using VLC Media Player

And the result:

How to take Screenshots using VLC Media Player

How to change your processor name?

Posted by Wonderful-Tricks

How to change your processor name?

Here i show you how to change processor name
See my original Processor Name is Intel(R) Pentium(R) 4 CPU 2.80GHz


How to change your processor name?

Now Go to Start > Run > type regedit >

How to change your processor name?

Then Go to

start>
run>
type regedit>
hkey_local_machine>
hardware>
discription>
system>
central processor>

on right hand side right click on processornamestring and then write anything u want in that textbox.

How to change your processor name?

modify and write what ever you want i write Super Computer Intel(R) Pentium(R) 10 CPU 9.99 GHz ;)

How to change your processor name?

See the Results
How to change your processor name?

Click to Know Source of the Content

How to clean up your hard drive to increase free space

There are many reasons why you would want to do this, such as:
  • Running out of space on your hard drive
  • System is running slow
  • System Restore points are not being created
  • Corrupted or infected System Restore points

We will address 6 areas in this tutorial.
  • Delete system temporary files
  • Delete TIF (Temporary Internet Files)
  • Delete old/infected System Restore points
  • Delete other areas where junk collects over time
  • Uninstall programs you don't need or use
  • Remove System Restore points


Areas 1, 2 and 4 can be handled manually but it's much easier and more thorough if you use one of two tools, CCleaner or ATF Cleaner. Both will delete junk files that accumulate in the system temp and temporary internet file areas as well as files from other areas, like Cookies, Browser History, MRU Cache, etc. etc.

CCleaner
This guide addresses the Cleaner and Tool areas of CCleaner. Please do not use the Registry area unless you
Know what you are doing
Have a full backup of the registry using ERUNT

Download and install CCleaner. Before doing anything else, click on Options on the left then click on Advanced and uncheck Only delete files in Windows Temp folders older than 48 hours.

Click on Cleaner on the left and look through the selections under the Windows and Applications tabs. Uncheck the ones you don't want cleaned up. For instance, on my XP SP3 system I uncheck:

Windows tab:

  • Internet Explorer - Cookies, History, Recently Typed URLs, Last Download Location, Autocomplete Form History.
  • Windows Explorer - All
  • System - Memory Dumps <- Very Important


Applications tab:

  • Firefox/Mozilla - Cookies, Download History, Internet History, Saved Form Information
  • Opera - Cookies, Internet History
  • Applications - Office XP


The entries listed under Windows and Applications will vary, depending on what is installed on your system.

Click on Analyze to see what CCleaner will delete. Once you are satisfied with the choices, click Run CCleaner to delete the files and folders listed. If you've not done this before, it can result in a significant increase in hard drive free space.

ATF Cleaner:

Download ATF Cleaner then run it. It does not have to be installed. On the Main window, select (at a minimum):
  • Windows Temp
  • All Users Temp
  • Temporary Internet Files
  • Java Cache
  • Recycle Bin


Cookies, Prefetch and History are up to you. I prefer to leave them alone as I depend on Cookies and History for web browsing. I also don't see any point in clearing Prefetch since XP will just rebuild it over time. It won't hurt, just slows things down a little for a short time.

Like CCleaner, ATF-Cleaner will delete files from the areas you check, but unlike CCleaner there is no Analyze button that allows you to see what will be deleted. Once you click the Empty Selected button, the files in the areas you checked will be deleted. Some folks prefer it because of it's simpler interface. Which one you use is a matter of personal preference.

Uninstall unneeded programs:
I'll cover three ways to do this.

Use the built in XP Add or Remove Programs Control Panel applet
Use the Tools section of CCleaner
Download, install and run Revo Uninstaller

XP Add or Remove Programs
There are two ways to get to Add or Remove Programs.

Click on Start then Run, type appwiz.cpl and press Enter or click OK
Click on Start then Control Panel (or Settings then Control Panel if using Classic mode) then double click on Add or Remove Programs.

Review the list of Currently Installed Programs. Once you have decided which ones you want to remove, click on it's name and a Change or Change/Remove button will be displayed. Click on it and follow instructions.

CCleaner Tools
Start CCleaner. Click on Tools on the left side. A list of installed programs will be displayed. As above, once you decide what you want to remove, click on it, only this time, click the Run Uninstaller button and follow instructions. DO NOT use the Delete Entry button unless you know for sure the program has already been deleted and just the entry in the installed programs area of the registry remains.

Revo Uninstaller
Revo can do many other functions besides uninstalling programs, so please be careful when using it. I will address just the Uninstaller function.

Download, install and run Revo Uninstaller. Make sure Uninstaller is selected at the top. As with the previous uninstallers, review what is shown and decide what you want to remove. Right click on each one in turn and select Uninstall then follow instructions.

The primary advantage Revo has over the other methods is that it will also scan the registry and remove any remnants of the program you just uninstalled. For this reason, I strongly urge you to make a full backup of the registry using ERUNT BEFORE using Revo.

Remove System Restore points
There are two ways to do this.

Delete all System Restore points and create a new one (best choice if malware is present)
Delete all but the most recent System Restore point (just free up hard drive space)

To delete all System Restore points, do the following:

  • Click on Start, All Programs, Accessories, System Tools and finally System Restore.
  • Click on System Restore Settings on the lower, left side.
  • Check Turn off System Restore on all drives, then click Apply and wait for it to complete. This will delete all existing restore points.
  • Uncheck Turn off System Restore on all drives, then click Apply and wait for it to complete. This will create a new System Restore point.
  • Close the System Properties window.


To delete all but the most recent System Restore point, do the following:

  • Open My Computer.
  • Right click on your XP boot drive and select Properties. Normally this will be C:.
  • Click on the Disk Cleanup button. The Disk Cleanup window will open. Wait for it to finish then the main Disk Cleanup window will open.
  • Click on the More Options tab.
  • Click on the Clean up... button under System Restore.Click Yes when you get the Are you sure you want to delete all but the most recent restore point prompt
  • Close all windows you opened for this procedure.


Adding Your Name Beside Taskbar Clock

Posted by Wonderful-Tricks

Adding Your Name Beside Taskbar Clock

Probably most of you have seen this trick before.But i think it's really nice.
I'm telling about adding your name beside taskbar clock.


Here is the trick (For windows XP):-
1. Click on Start menu. Then on Control panel.
2. Now click on “Regional and Language Options” icon.
3. In the “Regional Options” tab, click on “Customize” button.
4. After clicking “Customize” button, another window pops up. Now click on the “Time” tab.
5. Besides AM Symbol and PM Symbol, you can add anything that you want to display in the system tray.
6. If there is limitation of characters, you can even delete the AM and/or PM symbol. Apply, OK. Done.. Look at your task bar

Limitation of this trick:
You might have already observed that, you can not insert more than 12 characters(after deleting the AM and PM symbol).

To over come this limitation, we shall enter into registry.(Tested in Windows XP)
1. Click on Start button.
2. Click on Run.
3. Type regedit. Click Ok.
4. Now click the plus mark besides each of these -> HKEY_CURRENT_USER and then Control Panel and then International.

Adding Your Name Beside Taskbar Clock

5. Now click on International. And find these s1159 and s2359. Right click and select “Modify Binary Data“, as shown in the above figure.

Adding Your Name Beside Taskbar Clock

6. Now follow the above figure and modify the name.
Do not change the numbers. Just modify the text in the right most side. See to that, there is a period (DOT) after each character and 3 dots to specify/display a DOT in the system tray.

Enjoy!!!!!!!!!!!!!

Depositfiles Hack - No More

Firstly, you need to be using a Firefox/Mozilla browser.

Copy the Depositfiles download URL and paste it on your Browsers Address Bar, press Enter..

Now click on "Free Downloading".

Next, as soon as the COUNTDOWN Begins...
goto your browsers menu bar and click on VIEW >>PAGE STYLE>> NO STYLE

Now the Download Button will appear... click on it and start downloading....

No Waiting!


How to

In this post you will come to know How to "kill" a program which is not responding?


When a program is not responding everybody gets angry.
But how to instantly close it without getting errors or even restart the pc?
Here it is:
1.ctrl+alt+del
2.click on the program that is not responding
3.hold ctrl and press "end task"

That is all.The program will close in less than 10 seconds and you will be happy again.

Note: In vista you don't need to hold ctrl

Change Google Logo By your name.

Posted by Wonderful-Tricks

Change Google Logo By your name.

In this tutorial you will learn how you can make your own personal search engine with a custom name as logo. or How you can change the Google Logo by your name


1. Open your browser and go to the site

2. Type the name for your search engine.

3. Select the logo style. You can choose from a lot of styles including: Google Style, Yahoo!, Lord of the Rings, Shrek, Coca Cola, Matrix, Mickey Mouse, Harry Potter, etc.

4. Click Create Search Engine.

5. You search engine will be created. For this engine we used Google style.

How to create a folder named "con" in XP

Posted by Wonderful-Tricks

How to create a folder named - CON

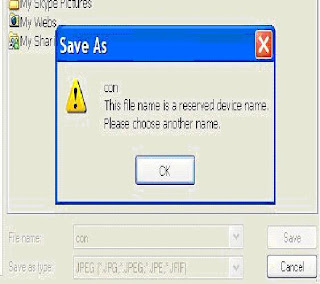
Creating a folder with 'con' as folder name is not possible in Windows. This is because 'con' is a reserved word since the DOS OS was created. The word 'con' stands for console. But there is a way to create a folder named 'con' at any location. Thats true! Run the following command in command prompt :

md\\.\\C:\\con


How to create a folder named - CON

This will create a folder with 'con' as its name. as shown below.

How to create a folder named - CON

To Delete the Folder:
Run the following command in command prompt :

rmdir\\.\\C:\\con


How to prevent the deletion of IE history

Posted by Wonderful-Tricks

How to prevent the deletion of IE history

How to prevent the deletion of IE (Internet Explorer) history?. This post is the solution for it, if you want to know what your office staffs, or family members surf in your absense. To avoid misuse of your computer, do not allow users to delete their browsing history.


To prevent deleting Internet Explorer history, just change the rights of the user account created by Windows. This trick works in Windows XP, 2000 and Vista.

- Type the shortcut Windows + R (or scroll down the menu Start, Run).

- Type gpedit.msc and Press Enter.

- Open records successively Local Computer Policy, Computer Configuration (If you want this change affects only the user account currently logged on, select User Configuration).

- Then double-click Administrative Templates, Windows Components, Internet Explorer and Delete Browsing History ( right Click on Turn off "Delete Browsing History" Functionality.)

- Check the Enable and click OK. You must restart your computer to apply changes. Once this change is effective, the Tools menu's "Delete Browsing History" is no longer available.

How to Update Kaspersky Offline!

Posted by Wonderful-Tricks

Update Kaspersky Offline

In this post, you will come to know how to update Kaspersky Anti-Virus Offline.


Follow the simple steps to download Updates :

Step 1 : Visit this Website and download latest KLUpdater.zip from there as it contains the GUI interface also.

Step2 : Once you downloaded KLUpdater.zip , Just extract the files in a Folder.

Step 3 : Now you will get extracted files, Now run the KasperskyUpdater.exe.

Step 4 : Now the Kaspersky Window will be appeared . Select the specific product for which you want to download the updates.

Step 5 : Check the boxes which I marked in the figure and select appropriate product. Once done . click on Apply and then press Start to start the downloading process.

Step 7 : Downloading files will be start and a Command prompt will pop up and will show the status. All the required update files will be now downloaded to the folder “Updates

Thats it. Once done, now you have the off-line
update for that product of kaspersky which you have selected.

How to use this downloaded files to update your Kaspersky product ??

* Right click on system tray icon of the Kaspersky Antivirus.
* Select the Update menu and click Settings .
* Click the Add menu, and find the location of the folder containing the update file above (download the Updates folder above)
* After added, remove the check for “Kaspersky Lab’s update server” and click OK.
* DONE.

How to download YouTube videos without using any programs!

Here is a tutorial for How to download YouTube videos without using any programs!. It is very useful. The videos downloaded are in .flv format so dont forget to donwload flv player.


TUTORIAL: How to download YouTube videos without using any programs!

  • Go to the YouTube video's page that you want to download.
  • Right-click the screen and click "View Source", or something similar, depending on your type of browser.
  • Open "Find" (Ctrl+F) and search for "video_id=" (without quotes).
  • After this is found, highlight the text from "video_id=" to the end of "title" (without quotes, and DO NOT include the equal sign at the end of title).
  • Copy this text.
  • In your browser, type in: "www.youtube.com/get_video?" (without quotes).
  • Paste the text you copied earlier at the end of the question mark.
  • Go to this URL. A box will open up with options to "Open" "Save" or "Cancel" the download of the file: "video.flv"
  • Save it.
  • You now have the video! (If you cannot view it, go to: http://www.mediafire.com/download.php?gwntnltemkm and download FLV Player)
  • You can merely watch it anytime you want (online or offline) or you can reupload it to your account (please only do so with owner of the video's permission, to avoid copyright infringement).


***I CANNOT BE HELD RESPONSIBLE FOR ANY COPYRIGHT INFRIGEMENT (OR ANYTHING ELSE) YOU GET INVOLVED WITH IN THE EVENT THAT YOU DOWNLOAD VIDEOS AND/OR PUT THEM ON THE INTERNET***

Browse the website on your desktop - Cool Trick

First of all open notepad and write down this code:

<html>
<body>
<iframe
src ="http://www.wonderful-tricks.blogspot.com"
width="100%" height="100%">
</iframe>
</body>
</html>|


and then save where ever you wish with .html extention
After you have saved go to desktop with right-click Properties - Desktop(tab) - Browse or Control Panel - Appearence and Themes (for removing this desktop backrground)and select your html file which is saved by you. You'll see you can directly go to a website without open a web browser,
You can see the sreenshot which i did on my desktop:

How to clear your computer's memory

Posted by Wonderful-Tricks

How to clear your computer's memory

It often happens our computer to operate its work very slowly.Most of people restart computer, but we have another simple method to proceed without restarting your OS.


1. Right-click on desktop and choose New-Shortcut
2. In the Type the location of the item write this code: %windir%\system32\rundll32.exe advapi32.dll,ProcessIdleTasks
3. Click Next
4. Name as Clear Memory
5. Click Finish.

Now whenever you see that your PC is working slowly go to this icon and click it, without restarting PC would clear your memory and speed up processes.

If u liked this post just say Thank you at least

How to check quality of movie without downloading all files

The best way to test quality and save bandwidth is:
Download the first rar file
Then extract remembering to check the "Keep broken file" tab then play the file.
For guide how to do it how a look at the above image.
In this way you can save your band width


How to burn an iso image to a cd

Posted by Wonderful-Tricks

How to burn an iso image to a cd

This tutorial will help you burn an image to a cd.
For this tutorial I will be using Nero because its the best one to use or you can use magic iso or ultra iso but for me Nero is fast.
If you would like another tutorial with a different program comment it here and I will be glad to help. Bare in mind that I used an old version of nero that came with my pc, but the old nero should have the same thing just better graphix


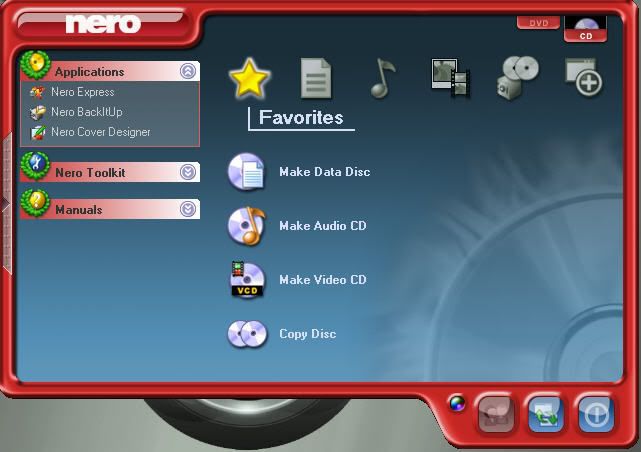
Second open up Nero:


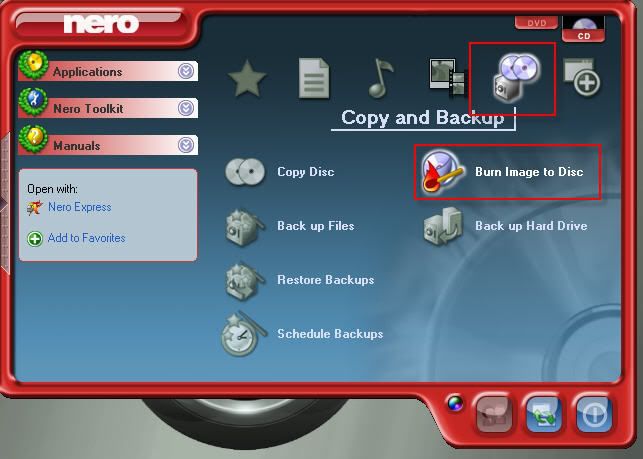
Next go to the copy and back up icon and click on burn image to cd:


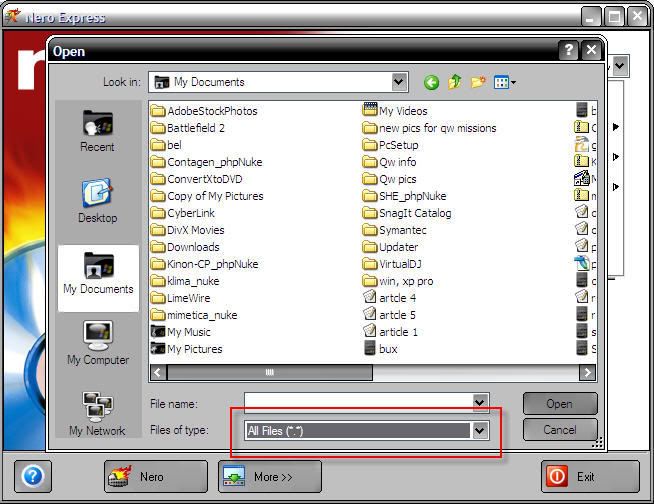
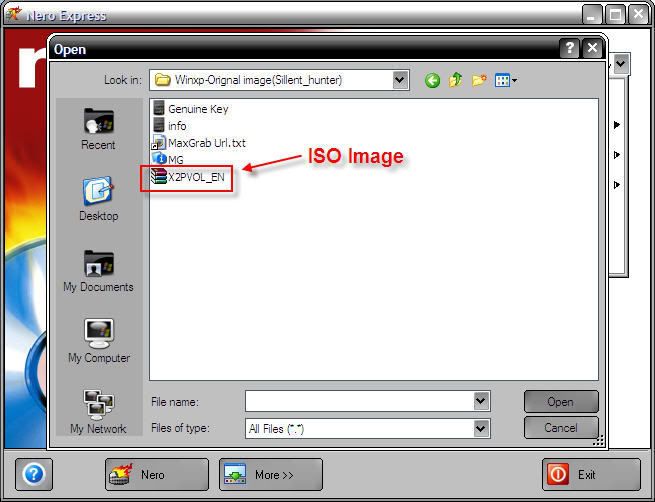
After that, you will get a window that looks like this:


After that make sure that you change the files of type to "all files" or else you wont be able to view your iso image


Next go to the location where you have saved you iso file and click on it:


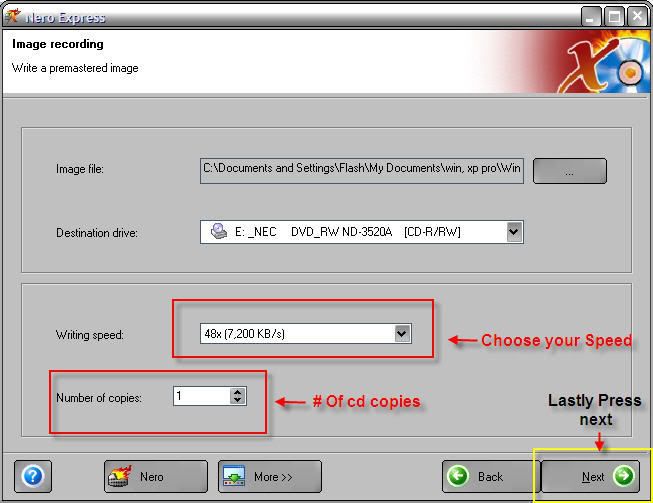
After you click on your iso image you will get a screen that looks like this:


Choose the options that you find reasonable and finally press next

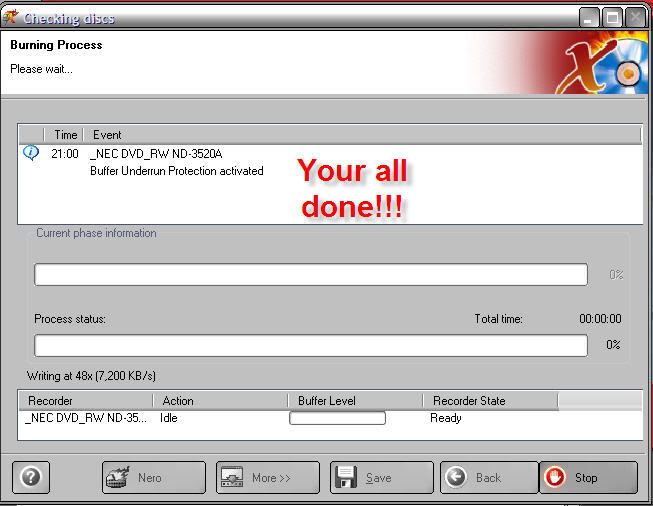
You will get a screen that looks like this indicating that your image is burning to your cd:


Finally, just wait til the process is done and you will have successfully burned an image to a cd.

How To Change Office 2007 Color Scheme

Posted by Wonderful-Tricks

How To Change Office 2007 Color Scheme

You can change the color scheme of the Microsoft Office 2007 applications so that they better match your existing desktop theme. To do this, follow this


1. Open up one of the Office applications (if you are going to use Outlook, then you will need to access a new message window).

2. Click on the big round Office Button in the upper left corner.

3. In the lower right corner, click the Options button.

4. In the left pane, select Popular.

5. In the right pane, use the Color scheme dropdown to select the desired scheme (blue, silver, or black).

6. Click OK.

Know the exact time of your System startup and shutdown

Guys this is easy trick to know when your system is started and shutdown..
When you are away ..just check and get known who used your system...
Follow these steps ..


Go to

>Start

>Run

>Type eventvwr.msc

>Click System by your left

The Event code

6005 ---- System start up

6006 ----System shutdown

you will know then by the caps above//

How to use Trial Version software forever without Expiration

Now we download stuff almost daily. New products pop out so often. You can use any software forever you want. You can download trial version, right. Trial version expires after some days. You can stop that expiration. You can tell trial version of the software to not count days or do not bother about time. The software will stay and keep working like original software forever and will not expire or cease to work. You do not have to change your system clock. This little software does it all.


Time Stopper is the software which can stop the time for try out version software. When you stop the time you can use your try-out versions forever. When you stop the time of a try-out version using this Time Stopper it works via this Time Stopper. Real time and date run normally on your system. You can use any number of try-out version softwares with this software.

How it Works
Open Time Stopper
Browse and select .exe of required trial software
Choose the new date (Any date which occurs in between your trial software time period before expiration, suggestion: set it to two days before trial software expiration date.)
Choose any time
Click open software on your selected date

If you wish to create an icon for your modified trial software and do not want to open Time stopper every time then use last button in software to create new icon. open that trial software after that from that newly created icon always otherwise it can expire.

Download Time Stopper

Click to Know Source of the Content

How To Rip PC Games

Posted by Wonderful-Tricks

How To Rip PC Games

How to RIP games
There are many people trying to learn how to RIP PC games, but have no idea how to start. I just thought i might give a small tutorial to help those to begin.

PC game RIPs can be done in two ways,

1. Ripping-off content that is not essential

2. Plain simple compression


Ripping-off content

~~~~~~~~~~~~~~

Games contain Audios, Cinematics (Cut-scenes), Credits, Unlockables, Extras and support for other languages. Not all these are essential to play the game. Some or all of these may be removes to reduce the size of the game.

Steps (Common to all RIPs)

1. Install the game to your hard drive

2. Download and install any requires patch for the game

3. Download a working crack and apply it

4. Run the game once and verify that the crack works, also goto options and reduce all the display options to LOW (helps low end PCs run your rip)

Steps to Remove contents

If you had noticed any language options while installing the game, it means that the game has multiple language support. We may remove all othre languages that are not required except the primary language (ex. English).

1. Browse to the location of the game and search the subfolders for any files/ folders named after languages.

Note: Shortforms of languages may also be used such as En-English, Po-Polish, Es-Spanish, Ru-Russian, etc.

2. Delete all other languages but your primary language

Note 1: It is better to create a dump folder where you move all these files so that you may recover them if your game dodes not load without them.

Note 2: Run the game after deleting a set of files and make sure the game runs properly without them, if not restore those files and proceed with the next set.

3. Now search for folders named Videos/ Movies/ Art, these may conotain the cinematics (cut-scenes). Do not delete the entire folder but browse into the folder and look at the files.

4. Most modern games use a popular format called BINK, with the extension .bik for the videos. These files can be viewed and recoded using RAD game tools from http://www.radgametools.com/bnkmain.htm

5. You can also recode the cut-scenes to a lower resolution or frame rate to reduce game size without loosing the videos. (This will be covered later in advance Ripping tutorial)

6. For now you may delete all the videos or just the unnecessory ones such as credits, Intro video or developer logo.

7. Run the game to make sure the game does not pop up any error messages. If you encounter any errors at the playback of the deleted videos, you may create a black jpeg picture and encode it into a bink video using RAD video tools (more details will be published in the advance ripping tutorial).

8. Similarly look for a folder named Audio / Sounds

9. You may delete the unnecessory audio files (but make sure you do not delete any game sounds, because playing a game without sound effects will be quite DUMB).

10. Finally look for any folders named HELP or Support. These contain help files for the game which are not required while playing the game, so you may delete them too

11. Now that we have removed the extra content, let us proceed to COMPRESSING the game files to reduce size

Steps to Compress game files

Let me cover the basic compression alone now. More detailed compression for specific file types will be covered in my later posts.

Things needed:

http://rapidshare.com/files/251314070/UHARC_GUI.2007-01-19.zip


Step 1

1. Open UHARC_GUI

2. Open the directory containing the files that you wish to archive.

3.Select the entire game folder

4. Select the Add Selected button

5. You can specify the name of the archive to be created at the top of this window

6. Under Compression choose ALZ-3 (Best) and enable multimedia compression

7. Under options make sure Include Subdirectories is selected and select Store relative paths

8. Select OK.

Now that we have compressed the game into a single file, let us go to the final step of making a dos installer for our RIP.

Creating a Batch file

1. Open the folder where our compressed game file is present

2. Open notepad and type the text between the horizontal lines

_________________COPY ___ START___________________

@echo off

_________________COPY ____ END ____________________


Note: Now we need to display a message about the name of the game and the name of the ripper so for this we’ll use a command called echo

_________________COPY ___ START___________________

echo GAME NAME

echo RIPPED BY “YOUR NAME”

echo.

echo.

echo.

echo.

pause

__________________COPY ____ END ___________________


eg

@echo off
color 0C
echo Ripped
echo ************************************************
echo * * By:Your Name * *
echo ***********************************************
pause>/p>

*NoTe* when viewed in cmd it looks better and spells Ripped

Note: The echo. is used to print a blank line and the pause command is used to wait for user input.

Now that we have displayed the information and recieved an input from the user, let us start extracting the compressed game files.

Then add

_________________COPY ___ START___________________

uharc.exe x -y+ FILENAME.uha nul
cls

___________________COPY ____ END __________________


E.g

@echo off
color 0C
echo Ripped
echo ************************************************
echo * * By:Your Name * *
echo ***********************************************
pause
echo Ripped
echo ************************************************
echo * * By:Your Name * *
echo ***********************************************
uharc.exe x -y+ FILENAME.uha nul
cls


You Can Also Add Some Options

Copy To Program Files

At The End Of Your Batch Add

cls
echo Do You Wish To Copy YourGAME To Program Files? Yes (Y) or No (N)....
SET /P M=
IF %M%==y GOTO copy
IF %M%==n GOTO finish


After that Add This

:copy
del FILENAME.uha nul
del UHARC.exe nul
xcopy /E /Y "*.*" "C:\Program files\" nul
copy /E /Y "*.*" "E:\Program files\" nul
copy /E /Y "*.*" "F:\Program files\" nul
Del "*.*"nul
Echo.
echo.
echo Copy Complete
echo.
echo.
pausenul
goto finish
:finish


Some Cool Looking Things For UR Batch

Exracting... ²²²²²²²²²²²²²²²²²²²² 1%%
Exracting... ÛÛÛ²²²²²²²²²²²²²²²²² 13%%


Option To Delete Or Not

echo Delete Files After Install? YES (Y) Or NO (N)
SET /P M=
IF %M%==y GOTO start1
IF %M%==n GOTO start2
pausenul


Start One Will Have the Same Batch Exept after

uharc.exe x -y+ FILENAME.uha nul
add
Del FILENAME.uha nul


****NOTE****
Before The Word NUL goes The Symbol Above On Your Full Stop Button That Looks Like an Arrow in a way -- Next to the ? symbol Asta Wont Show The Symbol

Where FILENAME is the name of the file that you just compressed.

Now save the notepad file as SETUP.BAT in the same folder as your compressed game.

Copy the uharc.exe file to the same folder for compression using uharc_gui respectively.

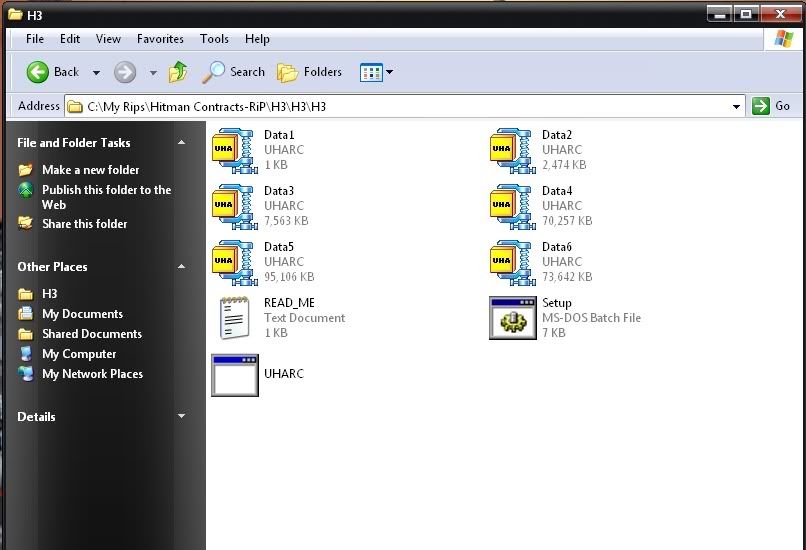
It should look Somthing like this ---- Except u should only have 1 .uha folder
How To Rip PC Games

Now the game has been successfully Ripped. Rename the folder to the game’s name. Burn the folder containing the Compressed game, SETUP.bat and the compressor exe file to a CD / DVD .

Now you have a just created a game RIP.

Installing your RIP

1. Copy the RIPPED game folder to your hard drive

2. Open the folder

3. Run SETUP.bat

4. Press any key to begin setup

5. After install has completed, run the game exe file from the folder

Click to Know Source of the Content

Most useful Opera Keyboard Shortcuts

Posted by Wonderful-Tricks

Most useful Opera Keyboard Shortcuts

If you are using Opera browser than you can browse a lot faster using the keyboard, and this page gives you an overview of the available keyboard shortcuts. Some operations have multiple shortcuts; use those you find most convenient.Pressing Alt Gr is the same as pressing Ctrl+Alt in opera.


CTRL+O: Open a file using Opera.

CTRL+S: Save a copy of the current page.

CTRL+SHIFT+P: Toggle Print Preview.

CTRL+P: Print the current page.

CTRL+Q: Shut down Opera.

CTRL+T: Open a new tab.

CTRL+W: Close the current tab.

CTRL+TAB: Move between active tabs.

SHIFT+SPACE BAR: Scroll one screen up.

PAGE UP: Scroll one screen up.

SPACE BAR: Scroll one screen down.

PAGE DOWN: Scroll one screen down.

CTRL+PAGE UP: Scroll one screen to the left.

CTRL+PAGE DOWN: Scroll one screen to the right.

HOME: Scroll to the top of the current document.

END: Scroll to the bottom of the current document.

CTRL+LEFT ARROW: Move to the previous page in your browsing history.

ALT+LEFT ARROW: Move to the previous page in your browsing history.

CTRL+RIGHT ARROW: Move to the next page in your browsing history.

ALT+RIGHT ARROW: Move to the next page in your browsing history.

F5: Reload the current page.

CTRL+R: Reload the current page.

CTRL+F: Find specified text in the current page.

CTRL+G: Find next instance of specified text in the current page.

CTRL+SHIFT+G: Find previous instance of specified text in the current page.

COMMA: Find specified text within links on the current page.

CTRL+PLUS: Zoom in on the current page by 10%.

PLUS: Zoom in on the current page by 10%.

CTRL+MINUS: Zoom out on the current page by 10%.

MINUS: Zoom out on the current page by 10%.

CTRL+0 (Zero): Restore zoom display on the current page to 100%.

F11: Use the entire screen for viewing the current page.

SHIFT+UP ARROW: Proceed to the next link up on the page.

SHIFT+DOWN ARROW: Proceed to the next link down on the page.

SHIFT+LEFT ARROW: Proceed to the next link to the left on the page.

SHIFT+RIGHT ARROW: Proceed to the next link to the right on the page.

ENTER: Activate the link that is currently selected.

SHIFT+ENTER: Activate the link that is currently selected in a new tab.

Focus

Cycle focus within active context Tab and Shift + Tab
Activate Enter
Edit item properties Alt + Enter
Ctrl + I
Exit context or cancel Esc
Display context (right-click) menu Ctrl + M

System keys

Open file Ctrl + O
Save copy of page Ctrl + S
Save copy of page with all images and elements Ctrl + Alt + S
Print page Ctrl + P
Close Opera Ctrl + Q
Hide Opera Ctrl + H

Loading keys

Access

Go to your home page Ctrl + Space
Alt + Home
Enter a Web address F2
Paste and go in current or new tab Ctrl + B
Paste and go in background tab Ctrl + Shift + B
Enter nickname for fast bookmark access Shift + F2
Save page address as new bookmark Ctrl + D
Save as new bookmark in active bookmark folder Ctrl + Shift + D
Transmission

Reload (get latest version of) page Ctrl + R
F5
Reload selected frame Alt + F5
Ctrl + Shift + R
Reload all open pages Ctrl + F5
Ctrl + Alt + R
Stop page loading Esc
Read selected text using voice function V
Cancel current voice prompt Esc

Blogumulus by Wonderful-Tricks

Followers