
Location : Tidel Park, Chennai Topics Covered in the Event : Paid Search Social Media Marketing
Remember the last meet in chennai called as the Search Camp by knowledge foundation. Well, here comes another event this year on 28th feb & 1st march, a two day event on search engine advertising, including optimization and marketing issues. If you have any idea about the above, then this meet can be your next destination because you can meet other guys who are in the same field and gain knowledge with bigger network.
Organic SEO
* Keyword Research
* Onpage Optimization
* Converting SEO Traffic
* Technical Issues for Developers
* Copywriting for Search
* SEO for Building Brands
* Local Search Marketing Tactics
* Link Baiting Strategies
* PPC Keywords & Bids
* Landing Page Strategies
* Automated Bid Management
* API
* Tracking Conversions
* Hot Social Media trends
* Online Reputation Management
* Monetizing Social Media Traffic
There is a entry fees of 500Rs per person

Google is coming up with a project called as ‘Google Bus’ on the Indian Roads very soon with a plan to create awareness among the Indians for helping them understand the different internet applications which can be useful to them in their daily life.
I guess its like a offer and promote system, where google is trying to teach people on how to use the internet , different simple applications like gmail, gtalk, google earth, google search, google desktop etc. Once people learn about these services they gain knowledge and start using these services in return getting google reach everyone.
The service is said to be started in Chennai where Google Bus is also going to monitor all the 600 Cyber-cafe/internet browsing centers and help the police. These buses would be equipped with wireless internet, high end computers and professionals who are going to offer these basic training.
I was surfing through the web and found a blog which gave information about this bus, but Google didn’t officially announce about this, hence we are not sure about this service, but if its not true, i really hope Google starts something like this because it can help out those people who are new to the internet.

Urge me is another free email based reminder service on the web but with a small twist. You pick a date when the task is due and Urge Me will send you email reminders as you get closer to the date.
As far as execution goes, Urge Me couldn’t be more concise. All you have to do is furnish your current e-mail address, type down the activity that you want to be reminded about, and then the date it has to be done.
Once you have complied with the abovementioned process, a series of reminders will be put your way so that you won’t forget about what has to be done. These messages are sent at a given frequency: one month, two weeks, one week, and a few days before the date comes around.
Finally, if for any reason you change your mind after setting down a “Urge me” and don’t want to be reminded about it, you can click on the link provided on the e-mails you receive and cancel the process. All in all, a nice and free way not to forget crucial dates and events again.
Give a try: Urge Me

Keyboard shortcuts are always useful; they have made our job easier. I just can’t imagine using my computer without shortcuts. Well, now that Windows 7 Beta is out and millions of people have already downloaded it, it’s time to know Windows 7 keyboard shortcuts. Here’s a list of the new Windows 7 keyboard shortcut keys to improve your productivity and speed.
Here is the List :
Most Windows 7 keyboard shortcuts mimic the behavior when dragging and dropping windows in the new operating system. Here is the list in case you like to use the keyboard instead of the mouse.
Win+UP Arrow :- Maximize the current window
Win+Down Arrow :- If the current window is maximized, restore it; if the current window is restored, minimize it
Win+Left Arrow :- Dock the current window to the left half of the screen
Win+Right Arrrow :- Dock the current window to the right half of the screen
Win+Home :- Minimize all but the current window
Win+P :- Open the projection menu (generally used for laptops connected to projectors)
Alt+F4 :- Close the active window
Alt+Tab :- Switch to previous active window
Alt+Esc :- Cycle through all open windows
Win+Tab :- Flip 3D
Ctrl+Win+Tab :- Persistent Flip 3D
Win+T :- Cycle through applications on taskbar (showing its live preview)
Win+M :- Minimize all open windows
Win+Shift+M :- Undo all window minimization
Win+D :- Toggle showing the desktop
Win+Up Arrow :- Maximize the current window
Win+Down Arrow :- If the current window is maximized, restore it; if the current window is restored, minimize it
Win+Left Arrow :- Dock the current window to the left half of the screen
Win+Right Arrow :- Dock the current window to the right half of the screen
Win+Home :- Minimize all but the current window

Hi Friends...This is a simple trick to play FM without connecting the headphones or earphones...This was checked by one of my friends with Moto W220 and its working perfectly..So it may work on all Motorola Phones.. Plz do check and give ur comments..
[Plz Note :This Is For MOTOROLA ONLY!!!]
Just Dial

*#**372#

or

*#**376#
Drop your comments here and let me know if this trick works for you!!
Here are the login details: User Name: Dq5veG Password: 32kilis61 Enjoy !!!![]()
Here I am going to provide you with a working rapidshare premium account, but please be moral and don’t change the password and login credentials.
This Premium Rapidshare Account is going to work Only Upto 16th March 2009. So Hurry Up.

If you are regular on Twitter, then you would be definitely knowing the importance of updating your profile with your blog posts as tweets, which will then be followed by your followers. But each time updating (tweeting) the new posts may not be so easy. So how about tweeting all the posts from your blog by itself ?
Twitterfeed has made this very easy for you!Just register with them, give your account details to them and every time you write a new post in your blog, it will be straight away displayed in your Twitter updates...
NOTE: You do not have to register with a new name at TwitterFeed, use your OpenID to Sign In. For blogger using Blogger.com as their blogging platform, they can use the url (SOMETHING.BLOGSPOT.COM) of their blogs to sign in.Then click on "create new feed" fill out the form and that's it....now your life will be more easier :)
You too get tiny URL for every post..

To fix the error because you should close some codes, for example, when you put the Meta Code verification from Yahoo as follow:
<META name="y_key" content="571cc8f9b9109919">
Although the codes given by Yahoo, but if you put it into blogger template, it must be error. To fix it, you should add the closing code. Because this is a meta code (see at the beginning of the codes <meta), therefore, the closing code must be with slash </meta>, example:
<meta content='acc338bdb31a8e100' name='y_key'></meta>
Or, for this case you just add the sign slash ( / ) at the end of the meta code, e.g.:
<meta content='acc338bdb31a8e100' name='y_key'/>
This is just an example, one thing you should remember is what have you done before the error message appears, this will be your guide.

If you don’t believe me just check out the screen shot above. I used to check my balance everyday and what I got was a dollar or two and sometimes only a few cents. But this new trick will help you make your account balance reach a huge amount you can ever imagine.
Wait, But this time Google will not be sending any checks for these balance. Yeah, the screenshot shown above was taken from a fake AdSense generator. You can generate a balance page with any amount you want. Use this trick to show your friends how much you “earned” with Google AdSense this month.
Oh, You still want the three steps. Okay, here they are
For those who came to this post on reading the title. Sorry to disappoint you guys. I wished there was some real way of making more $$ from AdSense. But as you know, money doesn’t come the easy way. So, work hard on your sites and money will start flowing through automatically.
Once again Sorry to disappoint you guys... Take Care..

Keyboards are not a fascinating feature on smart phones but the HTC begs to differ. The keyboard slides out from the right-hand side rather unique to the left which is characteristic of most mobile, but after being fully slid out, the keypad can then be slid upwards to a diagonal slant. This becomes a much more sensible idea because it combines a good-viewing angle with better elevation when typing in motion, compared to other smart phones. As well as having all the attributes and essential applications of a home computer it does a stylish imitation too. The keyboard is complete to the smallest detail with status lights for caps lock and shift functions. The 3-Mega Pixel module fitted to the TYTN II deserves to be known as one of the best camera modules fitted to a smartphone
Characteristic of the device is also a large amount of controls to be found underneath the screen. These include central navigation and soft-keys. There’s also a direct Internet Explorer button and a messaging key Windows Hot-Key, a. The UI included is relatively user-friendly, especially with a version of HTC’s TouchFLO included to allow for increased user interactivity. There’s also a navigation wheel located on the left-hand side with a dedicated ‘OK’ button underneath the wheel.
Adding to the all-round capabilities is the integration of a GPS-receiver. Also included in the package is also a ‘Taster’ version of the Tom Tom Navigator 6 software which allows download of one European City map free of charge.

The player has some interesting features such as its ability to support unprotected AAC files, meaning it will play back iTunesPlus tracks, though you can’t use iTunes to transfer them from player to other sound devices. The player is quite easy to use and if you are familiar with the iPod’s the player can also sync via drag-and-drop in Windows Explorer, or you can use a jukebox such as Windows Media Player or Rhapsody. Like previous models from this company this Zen also supports MP3, WAV, Audible, and both protected and unprotected WMA tracks. The player is however not compatible with Macs. The device is able to render photos in JPEG format, which Windows Media Player can convert to automatically during syncing. Videos that are compatible with the player include the player comes with an application called Zen Media Explorer, which takes care of the conversion of files quick and easy.
The following is a rundown of the features on the Creative Zen:
Width 3.3 in
Depth 0.4 in
Product type Digital player / radio
Height 2.2 in
PC interface(s) supported Hi-Speed USB
Weight 2.3 oz
Color Black
Digital player signal-to-noise ratio 97 dB
Flash memory installed 16 GB Integrated
Digital storage None
Dimensions (W x D x H) 3.3 in x 0.4 in x 2.2 in
Voice recording capable Yes
Included accessories USB 2.0 cable, Earphone
Packaged quantity 1
Software type Creative ZENcast Organizer, Creative Media Explorer, Drivers & Utilities
Digital storage media type None
Tuner type Digital Radio tuner
Station preset qty 32
Tuner bands FM
Digital player supported digital audio standards WMA, WAV, ADPCM, Audible, MP3, AAC
Digital player playback modes Playlist
Video playback support WMV9, DivX 4, MPED4, MJPEG, XviD3, DivX 5
Still image format JPEG
Sound output mode Stereo
Additional features Voice recording, USB 2.0 compatibility, Calendar, Built-in organizer, Volume limiter, Microsoft Outlook synchronization, Bass Boost
1 x USB cable - External
Connector type 1 x Headphones, 1 x Hi-Speed USB
Slot(s) provided 1 x SD Memory Card
Slot(s) Required None
So why not buy this device and carry your media with you wherever you go.

Uncover some of Windows XP’s secrets.
- It boasts how long it can stay up. Whereas previous versions of Windows were coy about how long they went between boots, XP is positively proud of its stamina. Go to the Command Prompt in the Accessories menu from the All Programs start button option, and then type ’systeminfo’. The computer will produce a lot of useful info, including the uptime. If you want to keep these, type ’systeminfo > info.txt’. This creates a file called info.txt you can look at later with Notepad. (Professional Edition only).
- You can delete files immediately, without having them move to the Recycle Bin first. Go to the Start menu, select Run… and type ‘gpedit.msc’; then select User Configuration, Administrative Templates, Windows Components, Windows Explorer and find the Do not move deleted files to the Recycle Bin setting. Set it. Poking around in gpedit will reveal a great many interface and system options, but take care — some may stop your computer behaving as you wish. (Professional Edition only).
- You can lock your XP workstation with two clicks of the mouse. Create a new shortcut on your desktop using a right mouse click, and enter ‘rundll32.exe user32.dll,LockWorkStation’ in the location field. Give the shortcut a name you like. That’s it — just double click on it and your computer will be locked. And if that’s not easy enough, Windows key + L will do the same.
- XP hides some system software you might want to remove, such as Windows Messenger, but you can tickle it and make it disgorge everything. Using Notepad or Edit, edit the text file /windows/inf/sysoc.inf, search for the word ‘hide’ and remove it. You can then go to the Add or Remove Programs in the Control Panel, select Add/Remove Windows Components and there will be your prey, exposed and vulnerable.
- For those skilled in the art of DOS batch files, XP has a number of interesting new commands. These include ‘eventcreate’ and ‘eventtriggers’ for creating and watching system events, ‘typeperf’ for monitoring performance of various subsystems, and ’schtasks’ for handling scheduled tasks. As usual, typing the command name followed by /? will give a list of options — they’re all far too baroque to go into here.
- XP has IP version 6 support — the next generation of IP. Unfortunately this is more than your ISP has, so you can only experiment with this on your LAN. Type ‘ipv6 install’ into Run… (it’s OK, it won’t ruin your existing network setup) and then ‘ipv6 /?’ at the command line to find out more. If you don’t know what IPv6 is, don’t worry and don’t bother.
- You can at last get rid of tasks on the computer from the command line by using ‘taskkill /pid’ and the task number, or just ‘tskill’ and the process number. Find that out by typing ‘tasklist’, which will also tell you a lot about what’s going on in your system.
- XP will treat Zip files like folders, which is nice if you’ve got a fast machine. On slower machines, you can make XP leave zip files well alone by typing ‘regsvr32 /u zipfldr.dll’ at the command line. If you change your mind later, you can put things back as they were by typing ‘regsvr32 zipfldr.dll’.
- XP has ClearType — Microsoft’s anti-aliasing font display technology — but doesn’t have it enabled by default. It’s well worth trying, especially if you were there for DOS and all those years of staring at a screen have given you the eyes of an astigmatic bat. To enable ClearType, right click on the desktop, select Properties, Appearance, Effects, select ClearType from the second drop-down menu and enable the selection. Expect best results on laptop displays. If you want to use ClearType on the Welcome login screen as well, set the registry entry HKEY_USERS/.DEFAULT/Control Panel/Desktop/FontSmoothingType to 2.
- You can use Remote Assistance to help a friend who’s using network address translation (NAT) on a home network, but not automatically. Get your pal to email you a Remote Assistance invitation and edit the file. Under the RCTICKET attribute will be a NAT IP address, like 192.168.1.10. Replace this with your chum’s real IP address — they can find this out by going to http://www.whatismyip.com — and get them to make sure that they’ve got port 3389 open on their firewall and forwarded to the errant computer.
- You can run a program as a different user without logging out and back in again. Right click the icon, select Run As… and enter the user name and password you want to use. This only applies for that run. The trick is particularly useful if you need to have administrative permissions to install a program, which many require. Note that you can have some fun by running programs multiple times on the same system as different users, but this can have unforeseen effects.
- Windows XP can be very insistent about you checking for auto updates, registering a Passport, using Windows Messenger and so on. After a while, the nagging goes away, but if you feel you might slip the bonds of sanity before that point, run Regedit, go to HKEY_CURRENT_USER/Software/Microsoft/Windows/Current Version/Explorer/Advanced and create a DWORD value called EnableBalloonTips with a value of 0.
- You can start up without needing to enter a user name or password. Select Run… from the start menu and type ‘control userpasswords2′, which will open the user accounts application. On the Users tab, clear the box for Users Must Enter A User Name And Password To Use This Computer, and click on OK. An Automatically Log On dialog box will appear; enter the user name and password for the account you want to use.
- Internet Explorer 6 will automatically delete temporary files, but only if you tell it to. Start the browser, select Tools / Internet Options… and Advanced, go down to the Security area and check the box to Empty Temporary Internet Files folder when browser is closed.
- XP comes with a free Network Activity Light, just in case you can’t see the LEDs twinkle on your network card. Right click on My Network Places on the desktop, then select Properties. Right click on the description for your LAN or dial-up connection, select Properties, then check the Show icon in notification area when connected box. You’ll now see a tiny network icon on the right of your task bar that glimmers nicely during network traffic.
- The Start Menu can be leisurely when it decides to appear, but you can speed things along by changing the registry entry HKEY_CURRENT_USER/Control Panel/Desktop/MenuShowDelay from the default 400 to something a little snappier. Like 0.
- You can rename loads of files at once in Windows Explorer. Highlight a set of files in a window, then right click on one and rename it. All the other files will be renamed to that name, with individual numbers in brackets to distinguish them. Also, in a folder you can arrange icons in alphabetised groups by View, Arrange Icon By… Show In Groups.
- Windows Media Player will display the cover art for albums as it plays the tracks — if it found the picture on the Internet when you copied the tracks from the CD. If it didn’t, or if you have lots of pre-WMP music files, you can put your own copy of the cover art in the same directory as the tracks. Just call it folder.jpg and Windows Media Player will pick it up and display it.
- Windows key + Break brings up the System Properties dialogue box; Windows key + D brings up the desktop; Windows key + Tab moves through the taskbar buttons.
- You can delete files immediately, without having them move to the Recycle Bin first. Go to the Start menu, select Run… and type ‘gpedit.msc’; then select User Configuration, Administrative Templates, Windows Components, Windows Explorer and find the Do not move deleted files to the Recycle Bin setting. Set it. Poking around in gpedit will reveal a great many interface and system options, but take care — some may stop your computer behaving as you wish. (Professional Edition only).

If you want to completely remove those icons from your Blog, read this article...
And if you would like to change the appearance of Quickedit Pencil icon, stay here. So, the default icon for Quick editing our Posts and Widgets are PEN and SCREWDRIVER. Like in the picture above.
Now, you know already that nobody can see these except you. But if you use them, and they do hurt your eyes, there's a way to change the appearance of Pencil icon.
First, back up your template.
Then go to:
DASHBOARD -- LAYOUT -- EDIT HTML, click on the EXPAND WIDGET TEMPLATES, and in the code section, find the following line of code (using CTRL + F for easy searching):
<a expr:href='data:post.editUrl' expr:title='data:top.editPostMsg'>
<img alt='' class='icon-action' height='18' src='http://www.blogger.com/img/icon18_edit_allbkg.gif' width='18'/>
...place URL of you picture instead of the Blogger URL (part in red). Save Settings.
Keep in mind that you should change the width='18' and height='18', if your picture is diferent size (if your pic is 25x25, change it to width='25' and height='25').
Save Settings. And that's it.
It's not very important customization, I know. But it can be fun....

These quick edit icons are very useful in fact. You can edit your Posts and all the Widgets (Gadgets) in one click...
They do mess up the looks a little bit, but only for your eyes. Nobody else can see those icons...
But, if they are unnecessary to you, there's a way to remove/hide them.
REMOVE PENCIL AND SCREWDRIVER (WRENCH)
To do this, you will have to go to: LAYOUT ► EDIT HTML ► and paste the code:
.quickedit{display:none;}
]]></b:skin>
</head>

<body>
...paste the code in RED ABOVE the existing code ]]></b:skin>
REMOVE PENCIL ICON (FOR EDITING POSTS)
Sign in to your blogger account, then go to: DASHBOARD ► SETTINGS ► BASIC, select "No" beside "Show Quick Editing on your Blog?".
Save Settings. And that's it.
REMOVE SCREWDRIVER ICON (FOR EDITING WIDGETS)
First, back up your template. Then go to:
DASHBOARD ► LAYOUT ► EDIT HTML ► click on the EXPAND WIDGET TEMPLATES, and find the following line in the code section (use CTRL + F for searching):
<b:include name='quickedit'/>
...you have to delete that line. Sometimes, you have to do it for every widget. For example, if you have 3 "screwdrivers", that means you have 3 widgets, and you have to delete a line for each..
CHANGE THE ICON PICTURE OF PENCIL into something else:...look here.

Zinmag Primus is a professional and white elegant Blogger template.The theme is equipped with adsense and banners which are the main moneymaking tools of bloggers. The theme layout is stylish, and dynamic contents elements are built into it. This theme will be a perfect choice for bloggers who look for high quality themes.This template was originally designed by Jinsona Design and Zinmag Primus Blogger Template converted by Falconhive
Demo site here : Download from here

I am up with a BSNL message center tested and working at the time of posting. This cell one message center also provides delivery reports for free.
The free number which you may use to send free sms to different networks is as below:
+ 919440099997
Updated: Jan 18 2009:
+ 919441099998
+ 919417799997
+ 919442099997
+ 919442099998
This message center number was shared by genxtricks. I tested this number with my friend and found it is working. Blogging it first so that our readers can make full use of it until it goes down.
Thank you Genxtricks for a nice share. Please continue to share if you get any new message center numbers or any other valuable information which may help our readers.
If you have got such free sms center numbers, please share in comments so that it helps everyone else.
![]()
If you want to improve your "About Me" profile widget, like the one shown in this post, then you should visit this website: Badge MakerUpload a picture, write about yourself or your blog, and add a footer text. That's it !Your new profile widget picture will be ready.Now upload it at Photobucket.com, get the direct link and use it in your Blog. To add this picture to your blogger blog, follow these steps:
Log in to Blogger, go to "Layout" , click on "Add a Gadget" -> HTML/JavaScript type.Then in the widget content, paste this code:
<a href="Your Blogger/Any other profile link"><img src="Direct link of the Image" width="250" /></a>
Change the code in RED color before pasting it in to the widget !

YYou would have seen a lot of blogs on technology, gadgets, SEO and money making tips, but of course there are many (mainly lady) bloggers, who love to blog about their thoughts, interests and family.
So those of you, who like to describe life and nature in words, then here's a perfect blog for you. The template is designed by Lorelei and converted to Blogger by Blogger Templates.
Demo
Download

Zixpk.com giving away it's old blogger template and named it 'Zixpk Blue'. It is 3 column blogger template with black theme, awesome navigation bar, web 2.0 style header and adsense ready blogger template.
Demo
Download Now

Gramophonica Blogger Template is a cool classic color scheme and web2.0-like interface very impressive template with inspiring music style design and nice color scheme.This template was originally designed by Ezwpthemes and gramophonica blogger template converted for blogger by Falconhive
Demo site here :
Download from here

Now Friends you can use yahoo smileys emotions in blogger comments as well. As you would have been using it in posts but now for blogger you can use them in your comments also and your readers will get happy and excited using them.
Now I will tell you how to install it in Blogger.
But first you should have inline comment form in your blogger (i.e embed comment form below bloggger posts) If you have it then its ok . Continue reading this post otherwise first install it by visiting this post..
Now How To Install It.
LAYOUT > EDIT HTML > EXPAND WIDGETS
Search (ctrl+F) for below codes:-
<p class='comment-footer'>
<b:if cond='data:post.embedCommentForm'>
<b:include data='post' name='comment-form'/>
<b:else/>
<b:if cond='data:post.allowComments'>
<h3><a expr:href='data:post.addCommentUrl'
expr:onclick='data:post.addCommentOnclick'>
<data:postCommentMsg/></a></h3>
</b:if>
</b:if>
</p>
</b:if>
Replace the above codes with below one:-
<p class='comment-footer'>
<b:if cond='data:post.embedCommentForm'>
<div style='-moz-background-clip: -moz-initial; -moz-background-origin: -moz-initial; -moz-background-inline-policy: -moz-initial; width: 369; text-align: left; border: 1px solid #cccccc; padding: 5px; background: #eeeddf; height:86'>
<b>
<img border='0' height='18' src='http://us.i1.yimg.com/us.yimg.com/i/mesg/emoticons7/21.gif' width='18'/> :))
<img border='0' height='18' src='http://us.i1.yimg.com/us.yimg.com/i/mesg/emoticons7/71.gif' width='18'/> ;))
<img border='0' height='18' src='http://us.i1.yimg.com/us.yimg.com/i/mesg/emoticons7/5.gif' width='18'/> ;;)
<img border='0' height='18' src='http://us.i1.yimg.com/us.yimg.com/i/mesg/emoticons7/4.gif' width='18'/> :D
<img border='0' height='18' src='http://us.i1.yimg.com/us.yimg.com/i/mesg/emoticons7/3.gif' width='18'/> ;)
<img border='0' height='18' src='http://us.i1.yimg.com/us.yimg.com/i/mesg/emoticons7/10.gif' width='18'/> :p
<img border='0' height='18' src='http://us.i1.yimg.com/us.yimg.com/i/mesg/emoticons7/20.gif' width='22'/> :((
<img border='0' height='18' src='http://us.i1.yimg.com/us.yimg.com/i/mesg/emoticons7/1.gif' width='18'/> :)
<img border='0' height='18' src='http://us.i1.yimg.com/us.yimg.com/i/mesg/emoticons7/2.gif' width='18'/> :(
<img border='0' height='18' src='http://us.i1.yimg.com/us.yimg.com/i/mesg/emoticons7/8.gif' width='18'/> :X
<img border='0' height='18' src='http://us.i1.yimg.com/us.yimg.com/i/mesg/emoticons7/12.gif' width='18'/> =((
<img border='0' height='18' src='http://us.i1.yimg.com/us.yimg.com/i/mesg/emoticons7/13.gif' width='18'/> :-o
<img border='0' height='18' src='http://us.i1.yimg.com/us.yimg.com/i/mesg/emoticons7/7.gif' width='20'/> :-/
<img border='0' height='18' src='http://us.i1.yimg.com/us.yimg.com/i/mesg/emoticons7/11.gif' width='18'/> :-*
<img border='0' height='18' src='http://us.i1.yimg.com/us.yimg.com/i/mesg/emoticons7/22.gif' width='18'/> :|
<img border='0' height='18' src='http://us.i1.yimg.com/us.yimg.com/i/mesg/emoticons7/35.gif' width='24'/> 8-}
<img border='0' height='18' src='http://us.i1.yimg.com/us.yimg.com/i/mesg/emoticons7/100.gif' width='31'/> :)]
<img border='0' height='18' src='http://us.i1.yimg.com/us.yimg.com/i/mesg/emoticons7/102.gif' width='44'/> ~x(
<img border='0' height='18' src='http://us.i1.yimg.com/us.yimg.com/i/mesg/emoticons7/104.gif' width='30'/> :-t
<img border='0' height='18' src='http://us.i1.yimg.com/us.yimg.com/i/mesg/emoticons7/66.gif' width='18'/> b-(
<img border='0' height='18' src='http://us.i1.yimg.com/us.yimg.com/i/mesg/emoticons7/62.gif' width='18'/> :-L
<img border='0' height='18' src='http://us.i1.yimg.com/us.yimg.com/i/mesg/emoticons7/14.gif' width='34'/> x(
<img border='0' height='18' src='http://us.i1.yimg.com/us.yimg.com/i/mesg/emoticons7/24.gif' width='30'/> =))
</b>
</div>
<b:include data='post' name='comment-form'/>
<b:else/>
<b:if cond='data:post.allowComments'>
<a expr:href='data:post.addCommentUrl' expr:onclick='data:post.addCommentOnclick'><data:postCommentMsg/></a>
</b:if>
</b:if>
</p>
</b:if>
PREVIEW IF NO ERRORS SAVE IT NOW !
Now find the tag </body>
and place this script before it.
<script src='http://bandofgirls.googlepages.com/smiley.js' type='text/javascript'/><noscript><a href="http://anshuldudeja.blogspot.com" target="_blank">Blogger Widgets</a></noscript>
thats it Yor are done!!
Drop Down Menu For Blogger as everybody would like it in the blog. Just choose an option and click the menu you like , new window will open with the option selected. Below is the demo of it.
Now how to make this drop down menu.
Just GO To ,
LAYOUT > ADD PAGE ELEMENT > HTML /JAVASCRIPT
Add the below codes to it and Save It.
<form><select name="menu" onchange="window.open(this.options[this.selectedIndex].value,'_blank')"
size=1 name=menu>

<option>- Your Title - </option>

<!-- change the links with your own -->

<option value="http://yourlink.com">Title One</option>

<option value="http://yourlink.com">Title second</option>

<option value="http://yourlink.com">Title Third</option>

<option value="http://wonderfultricks.blogspot.com">blogger widget</option>

</select></form>
* Change the links and text in red according to your blog menu.
You can increase the options in codes to increase your drop down menu links.
Width of drop down menu depends on the length of the titles you using in them.
Here's one more thing which folks find irritating. Or unnecessary. When you click on one of your labels, blogger filters your posts tagged with that particular label. That's great, but we don't need a big box saying the same thing. If you like it though, even better. But maybe your readers don't...
So, if you want to remove it, follow me. It's an easy one.
Go to:
DASHBOARD -- LAYOUT -- EDIT HTML -- hit EXPAND WIDGET TEMPLATES, find the following part of code:
<b:includable id='status-message'>
<b:if cond='data:navMessage'>
<div class='status-msg-wrap'>
<div class='status-msg-body'>
<data:navMessage/>
</div>
<div class='status-msg-border'>
<div class='status-msg-bg'>
<div class='status-msg-hidden'><data:navMessage/></div>
</div>
</div>
</div>
<div style='clear: both;'/>
</b:if>
</b:includable>
Delete the code from above and replace it with this one:
<b:includable id='status-message'>
<b:if cond='data:navMessage'>
<div>
</div>
<div style='clear: both;'/>
</b:if>
</b:includable>
Save the template. View your blog and click on some label....no more box.
Newspaper Style First Alphabet In Blogger Posts
Write in newspaper i.e magazine style in blogger posts as with first alphabet with big font and size as you may be seeing in this post.My first alphabet W is in newspaper style that is Big in size.So i think there is no need to show demo.
Now how to install it is just simple.
Go to Edit HTML and find ]]></b:skin>
Add the below codes before it
.newspaper {
float:left;
color:#000;
background:#fff;
line-height:80px;
padding-:1px 5px 0 0;
font-family:times;
font-size:100px;
}
You can adjust the font size and line height and color also i.e in red in the codes above according to the size of alphabet and color you want to use to adjust looks of your blog.
Now save your Template.
Now got to Setings > Fromatting > Post template
And add the below codes there and save it.
<span class="newspaper">First Alphabet</span>
Now When ever you will start a new post you will get the above codes in edit html tab where you can place your first letter in place of First alphabet.
Or add the above codes manually before starting every post and place your 1st letter in between <span id="newspaper">1st Letter</span>
How to add Random Posts Widget for Blog?
Seen a lot people finding a Random Post widget for there blog? Then thought should have an tutorial on how to install it too in the blog.Well, here it is. If you want to know what it do is, whenever a reader click on link created by this widget all the times a different post will open for the reader in the blog as by luck.
Now lets see how to install it in your blog as it is very simple.
Go to Page Elements and click on Add a Gadget on the sidebar. Select HTML/Javascript and add the javascript code given below and save the widget/gadget.
<div id="myLuckyPost"></div> <script type="text/javascript"> function showLucky(root){ var feed = root.feed; var entries = feed.entry || []; var entry = feed.entry[0]; for (var j = 0; j < entry.link.length; ++j){if (entry.link[j].rel == 'alternate'){window.location = entry.link[j].href;}}} function fetchLuck(luck){ script = document.createElement('script'); script.src = '/feeds/posts/summary?start-index='+luck+'&max-results=1&alt=json-in-script&callback=showLucky'; script.type = 'text/javascript'; document.getElementsByTagName('head')[0].appendChild(script); } function feelingLucky(root){ var feed = root.feed; var total = parseInt(feed.openSearch$totalResults.$t,10); var luckyNumber = Math.floor(Math.random()*total);luckyNumber++; a = document.createElement('a'); a.href = '#random'; a.rel = luckyNumber; a.onclick = function(){fetchLuck(this.rel);}; a.innerHTML = 'Are ya feeling lucky, punk?'; document.getElementById('myLuckyPost').appendChild(a); } </script> <script src="/feeds/posts/summary?max-results=0&alt=json-in-script&callback=feelingLucky"></script>
I hope you will install it very easily Good Luck!!

Horizontal Navigation Top Menu Links For Blogger
Top Horizontal Navigation Menu Links For Blogger:-This is very important hack for bloggers as we need to create a top menu of links with our links to important pages making the navigation in your blog very easy for your readers.As i have also explained an easy way before to add top menu links to blogger but some would have not liked the styled of that navigational menu links.
How to add these top navigational links below blogger header:-
1. Login in to blogger dashboard
2. Go to 'Layout'
3. Click on Edit HTML.
4. And Search For </b:skin>
Now add these codes before it-
/* ----- LINKBAR ----- */
#bg_nav {
background: #000;
width: 960px;
height: 29px;
font-size: 11px;
font-family: Arial, Tahoma, Verdana;
color: #FFF;
font-weight: bold;
margin: 0px auto 0px;
padding: 0px;
border-top: 1px solid #333;
border-bottom: 1px solid #000;
overflow: hidden;
}

#bg_nav a, #bg_nav a:visited {
color: #FFF;
font-size: 11px;
text-decoration: none;
text-transform: uppercase;
padding: 0px 0px 0px 3px;
}

#bg_nav a:hover {
color: #FFF;
text-decoration: underline;
padding: 0px 0px 0px 3px;
}

#navleft {
width: 720px;
float: left;
margin: 0px;
padding: 0px;
}

#navright {
width: 220px;
font-size: 11px;
float: right;
margin: 0px;
padding: 6px 5px 0px 0px;
}

#navright a img {
border: none;
margin: 0px;
padding: 0px;
}


#nav {
margin: 0px;
padding: 0px;
list-style: none;
}

#nav ul {
margin: 0px;
padding: 0px;
list-style: none;
}

#nav a, #nav a:visited {
background: #222;
color: #FFF;
display: block;
font-weight: bold;
margin: 0px;
padding: 8px 15px;
border-left: 1px solid #000;
}

#nav a:hover {
background: #6e6d6d;
color: #FFFFFF;
margin: 0px;
padding: 8px 15px;
text-decoration: none;
}

#nav li {
float: left;
margin: 0px;
padding: 0px;
}

#nav li li {
float: left;
margin: 0px;
padding: 0px;
width: 150px;
}

#nav li li a, #nav li li a:link, #nav li li a:visited {
background: #333;
width: 160px;
float: none;
margin: 0px;
padding: 7px 30px 7px 10px;
border-bottom: 1px solid #000;
border-left: 1px solid #000;
border-right: 1px solid #000;
}

#nav li li a:hover, #nav li li a:active {
background: #666;
padding: 7px 30px 7px 10px;
}

#nav li ul {
position: absolute;
width: 10em;
left: -999em;
}

#nav li:hover ul {
left: auto;
display: block;
}

#nav li:hover ul, #nav li.sfhover ul {
left: auto;
}
Please edit the width of the above codes in red to adjust to the width of the navigation menu to adjust it to yours template width.You can change the color, height and design of above code also if you are capable of it.
Now Search for below codes-
<div id='header-wrapper'>
<b:section class='header' id='header' maxwidgets='1' showaddelement='no'>
<b:widget id='Header1' locked='true' title='Testing templates (Header)' type='Header'/>
</b:section>
</div>
And add the below codes after the above codes:-
<div id='bg_nav'>
<div id='navleft'>
<div id='nav'>
<ul>
<li><a href='/'>home</a></li>
<li><a href='http://wonderful-tricks.blogspot.com/search/label/Blogger%20Tricks'>Blogger Hacks</a></li>
<li><a href='http://wonderful-tricks.blogspot.com/search/label/Blogging'>Blogging</a></li>
<li><a href='http://wonderful-tricks.blogspot.com/search/label/Mobile%20Tricks'> Mobile Tricks</a></li>
<li><a href='http://wonderful-tricks.blogspot.com/search/label/Blogger%20Templates'>Blogger Templates</a></li>
</ul>
</div>
</div>
</div>
Thats It Now Preview It.If its working fine just save your template.
Change the links above in codes to yours.I hope you would like this navigation menu for sure.I will be back with one more great navigation link bar menu for sure ,uptil then enjoy this.

Numbered Page Navigation Hack for Bloggers
Numbered page Navigation widget is very beautiful widget used by bloggers. As you know i have posted this widget before in my blog post.But the css layout of widget works different for some blogs and for some it don't. so i am posting another layout so as if first one doesn't work for some blogs this may work.
How to add this Page Navigation Menu Widget:
Login To Your Blogger And Then Click On Settings And Navigate To Layout Section.
Then Click On Add Page Element.
A new Window Will Open in Which Select Add Html/Javascript.
Now Copy The Whole script Below And Paste in it.
<style>
.showpageArea {padding: 0 2px;margin-top:10px;margin-bottom:10px;
}
.showpageArea a {border: 1px solid #505050;
color: #000000;font-weight:normal;
padding: 3px 6px !important;
padding: 1px 4px ;margin:0px 4px;
text-decoration: none;
}
.showpageArea a:hover {
font-size:11px;
border: 1px solid #333;
color: #000000;
background-color: #FFFFFF;
}
.showpageNum a {border: 1px solid #505050;
color: #000000;font-weight:normal;
padding: 3px 6px !important;
padding: 1px 4px ;margin:0px 4px;
text-decoration: none;
}
.showpageNum a:hover {
font-size:11px;
border: 1px solid #333;
color: #000000;
background-color: #FFFFFF;
}
.showpagePoint {font-size:11px;
padding: 2px 4px 2px 4px;
margin: 2px;
font-weight: bold;
border: 1px solid #333;
color: #fff;
background-color: #000000;
}
.showpage a:hover {font-size:11px;
border: 1px solid #333;
color: #000000;
background-color: #FFFFFF;
}
.showpageNum a:link,.showpage a:link {
font-size:11px;
padding: 2px 4px 2px 4px;
margin: 2px;
text-decoration: none;
border: 1px solid #0066cc;
color: #0066cc;
background-color: #FFFFFF;}
.showpageNum a:hover {font-size:11px;
border: 1px solid #333;
color: #000000;
background-color: #FFFFFF;
}
</style>
<script type="text/javascript">
function showpageCount(json) {
var thisUrl = location.href;
var htmlMap = new Array();
var isFirstPage = thisUrl.substring(thisUrl.length-14,thisUrl.length)==".blogspot.com/";
var isLablePage = thisUrl.indexOf("/search/label/")!=-1;
var isPage = thisUrl.indexOf("/search?updated")!=-1;
var thisLable = isLablePage ? thisUrl.substr(thisUrl.indexOf("/search/label/")+14,thisUrl.length) : "";
thisLable = thisLable.indexOf("?")!=-1 ? thisLable.substr(0,thisLable.indexOf("?")) : thisLable;
var thisNum = 1;
var postNum=1;
var itemCount = 0;
var fFlag = 0;
var eFlag = 0;
var html= '';
var upPageHtml ='';
var downPageHtml ='';
var pageCount=5;
var displayPageNum=3;
var firstPageWord = 'First';
var endPageWord = 'Last';
var upPageWord ='Previous';
var downPageWord ='Next';
var labelHtml = '<span class="showpageNum"><a href="/search/label/'+thisLable+'?&max-results='+pageCount+'">';
for(var i=0, post; post = json.feed.entry[i]; i++) {
var timestamp = post.published.$t.substr(0,10);
var title = post.title.$t;
if(isLablePage){
if(title!=''){
if(post.category){
for(var c=0, post_category; post_category = post.category[c]; c++) {
if(encodeURIComponent(post_category.term)==thisLable){
if(itemCount==0 || (itemCount % pageCount ==(pageCount-1))){
if(thisUrl.indexOf(timestamp)!=-1 ){
thisNum = postNum;
}
postNum++;
htmlMap[htmlMap.length] = '/search/label/'+thisLable+'?updated-max='+timestamp+'T00%3A00%3A00%2B08%3A00&max-results='+pageCount;
}
}
}
}//end if(post.category){
itemCount++;
}
}else{
if(title!=''){
if(itemCount==0 || (itemCount % pageCount ==(pageCount-1))){
if(thisUrl.indexOf(timestamp)!=-1 ){
thisNum = postNum;
}
if(title!='') postNum++;
htmlMap[htmlMap.length] = '/search?updated-max='+timestamp+'T00%3A00%3A00%2B08%3A00&max-results='+pageCount;
}
}
itemCount++;
}
}
for(var p =0;p< htmlMap.length;p++){
if(p>=(thisNum-displayPageNum-1) && p<(thisNum+displayPageNum)){
if(fFlag ==0 && p == thisNum-2){
if(thisNum==2){
if(isLablePage){
upPageHtml = labelHtml + upPageWord +'</a></span>';
}else{
upPageHtml = '<span class="showpage"><a href="/">'+ upPageWord +'</a></span>';
}
}else{
upPageHtml = '<span class="showpage"><a href="'+htmlMap[p]+'">'+ upPageWord +'</a></span>';
}
fFlag++;
}
if(p==(thisNum-1)){
html += ' <span class="showpagePoint"><u>'+thisNum+'</u></span>';
}else{
if(p==0){
if(isLablePage){
html = labelHtml+'1</a></span>';
}else{
html += '<span class="showpageNum"><a href="/">1</a></span>';
}
}else{
html += '<span class="showpageNum"><a href="'+htmlMap[p]+'">'+ (p+1) +' </a></span>';
}
}
if(eFlag ==0 && p == thisNum){
downPageHtml = '<span class="showpage"> <a href="'+htmlMap[p]+'">'+ downPageWord +'</a></span>';
eFlag++;
}
}//end if(p>=(thisNum-displayPageNum-1) && p<(thisNum+displayPageNum)){
}//end for(var p =0;p< htmlMap.length;p++){
if(thisNum>1){
if(!isLablePage){
html = '<span class="showpage"><a href="/">'+ firstPageWord +' </a></span>'+upPageHtml+' '+html +' ';
}else{
html = ''+labelHtml + firstPageWord +' </a></span>'+upPageHtml+' '+html +' ';
}
}
html = '<div class="showpageArea"><span style="padding: 2px 4px 2px 4px;margin: 2px 2px 2px 2px;border: 1px solid #333; background-" class="showpage">Page '+thisNum+' of '+(postNum-1)+': </span>'+html;
if(thisNum<(postNum-1)){
html += downPageHtml;
html += '<span class="showpage"><a href="'+htmlMap[htmlMap.length-1]+'"> '+endPageWord+'</a></span>';
}
if(postNum==1) postNum++;
html += '</div>';
if(isPage || isFirstPage || isLablePage){
var pageArea = document.getElementsByName("pageArea");
var blogPager = document.getElementById("blog-pager");
if(postNum <= 2){
html ='';
}
for(var p =0;p< pageArea.length;p++){
pageArea[p].innerHTML = html;
}
if(pageArea&&pageArea.length>0){
html ='';
}
if(blogPager){
blogPager.innerHTML = html;
}
}
}
</script>
<script src="/feeds/posts/summary?alt=json-in-script&callback=showpageCount&max-results=99999" type="text/javascript"></script>
<div style="text-align:right;font-size:10px;color:000000;margin-top:15px;display:none;"> <a href="http://wonderful-tricks.blogspot.com">Blogger Widget</a></div>
After Adding this script you need to drag and drop the widget below the Blog Posts main widget. See this in below screen shot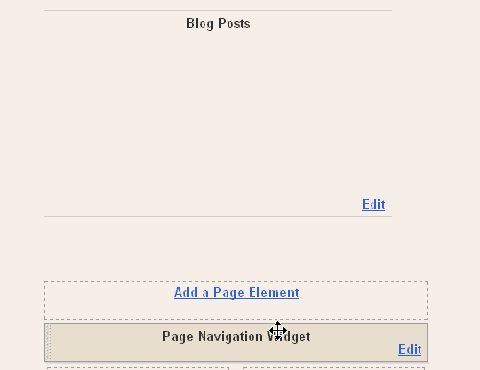
In the above code you can find the below written word ( IN RED )and can change its value from 5 to any you want.
1 : var pageCount = 5;
*where 5 is the the number of post that apppear in another page you will visit.
You can change even other parameters in above code which is shown in RED.
.gif)
How to add alert script to Blogs?
How about you? Would you like to add it? If you want to add it, don’t add it too much because it really bothers the visitors.
In order to add script alert facility in our blog follow the below steps:
- Login into blogger.
- Click Layout.
- Click Edit HTML tab
- Mark Download Full Template. Please save your template first. Always save the template before editing it. It is aimed at anticipating if there is a mistake when you are editing your template. If you make mistake in editing, you still have a back up and be able to return your template normal.
- Find the code </head>.
- Copy and paste the following code above of </head>. (change the red sentences with your own sentences).
<SCRIPT language='JavaScript'>alert("Welcome To My Blog");</SCRIPT> - Click Save Template
- Done and open you blog to see the result.
How to add Stript Ad to Blogs?
One of implementation that I have applied is the message to subscribe the feed as you can see at the image below:

- Login into blogger with your ID
- Click Layout
- Click Edit HTML tab
- Click Download Full Template and please back up your template first.
- Copy and Paste the following code right above ]]><b:skin>
#mta_bar {
background:#003366;
border-top: 3px solid #6699ff;
margin: 0;
padding: 7px 0;
z-index: 100;
bottom:0px;
right:0px;
width: 100%;
overflow: auto;
position: fixed;
}
* html #mta_bar{
/*IE6 hack*/
position: absolute;
width: expression(document.compatMode=="CSS1Compat"? document.documentElement.clientWidth+"px" : body.clientWidth+"px");
}
#mta_bar .left { float: left; text-align: center; font-family: Arial; font-size: 13px; font-weight: bold; font-style: normal; color: #0000FF; width:92%;}
#mta_bar .right {font-family: Arial, Helvetica, sans-serif; float: right; text-align: center; font-weight: normal; font-size: 10px;letter-spacing: 0; width: 30px; white-space: nowrap;}
#mta_bar .right a {font-size: 10px; color: #0000FF; text-decoration: underline;}
#mta_bar .right a:hover {font-size: 10px; color: #0000FF; text-decoration: none;}
#left_bar a {background: url('https://blogger.googleusercontent.com/img/b/R29vZ2xl/AVvXsEi9V4qSr6p_sW85NAmNsjCo_tEo8aE1395eYJuntwidawvhI2goV1KTJ1ffVlVlKlbn5j5DiV2zV00HC0U6CW46gF63e-9EMvECiFvP4fAsKIHfvu7_zYhP3NTDY2ICDTVeblSj5mrcb_Q/?imgmax=800') no-repeat; text-decoration: none; color: #fff; padding:5px 0px 5px 30px;}
#left_bar a:hover { text-decoration: underline; color: #fff; } - Find this code </head> in your template
- Copy and paste the following code right above </head>
<script type='text/javascript'>
//<![CDATA[
var mta_arr = new Array();
var mta_clear = new Array();
function mtaFloat(mta) {
mta_arr[mta_arr.length] = this;
var mtapointer = eval(mta_arr.length-1);
this.pagetop = 0;
this.cmode = (document.compatMode && document.compatMode!="BackCompat") ? document.documentElement : document.body;
this.mtasrc = document.all? document.all[mta] : document.getElementById(mta);
this.mtasrc.height = this.mtasrc.offsetHeight;
this.mtaheight = this.cmode.clientHeight;
this.mtaoffset = mtaGetOffsetY(mta_arr[mtapointer]);
var mtabar = 'mta_clear['+mtapointer+'] = setInterval("mtaFloatInit(mta_arr['+mtapointer+'])",1);';
mtabar = mtabar;
eval(mtabar);
}
function mtaGetOffsetY(mta) {
var mtaTotOffset = parseInt(mta.mtasrc.offsetTop);
var parentOffset = mta.mtasrc.offsetParent;
while ( parentOffset != null ) {
mtaTotOffset += parentOffset.offsetTop;
parentOffset = parentOffset.offsetParent;
}
return mtaTotOffset;
}
function mtaFloatInit(mta) {
mta.pagetop = mta.cmode.scrollTop;
mta.mtasrc.style.top = mta.pagetop - mta.mtaoffset + "px";
}
function closeTopAds() {
document.getElementById("mta_bar").style.visibility = "hidden";
}
//]]></script> - Find this code </body> in your template ( end of template code)
- Copy and paste the following code right above </body>
(change the red mark with your’s)
</body><div id='mta_bar'>
<div id='left_bar'><span class='left'><a href='http://feeds.feedburner.com/wonderfultricks' target='_blank'>More than 300 have subcribed in readers, have you?</a></span></div>
<span class='right' onmouseout='self.status=''' onmouseover='self.status='wonderful-tricks.blogspot.com';return true;'> <img align='absmiddle' border='0' onClick='closeTopAds();return false;' src='https://blogger.googleusercontent.com/img/b/R29vZ2xl/AVvXsEgRrFjcM6PhTSMTLIUHEaj1R9u6Bs5sqk5qzUWAQFNeqM2NjlxfHT3Aa6dSdViukCr5IUk03juDvkw97CNheMA3yOuY8Nxz9dTNkF9cBBVhfZwxGG95FFcO375S7yoJPP1QSo0M8TypbLM/?imgmax=800' style='cursor:hand;cursor:pointer;'/></span></div> - Click Save template
- Finish and see the result.
How to Create "breadcrumb-navigation" in Blogger

The navigation like above is known better by the name of “breadcrumb-navigation”. With the “breadcrumb-navigation” the readers can easily know the position of an article that’s being read and also can search the articles in the same category.
Can “breadcrumb-navigation” be installed in blogger? The answer is of course, yes. With a few modifications of your template code, then the “breadcrumb-navigation” will be yours soon. Below are the ways:
- Please log in to blogger with your ID
- Click Layout
- Click Edit HTML tab
- Click Download Full Template and please back up your template first
- Please check the small box beside Expand Widget Template
- Find the code ]]></b:skin>
- Copy and paste the code below exactly above the code ]]></b:skin>
.breadcrumbs {
padding:5px 5px 5px 0px;
  margin: 0px 0px 15px 0px;
font-size:95%;
  line-height: 1.4em;
border-bottom:3px double #e6e4e3;
} - Find the following code in your template :
<div class='post hentry uncustomized-post-template'> - Copy and paste the code below exactly below the code <div class='post hentry uncustomized-post-template'>
b:if cond='data:blog.homepageUrl == data:blog.url'>
<b:else/>
<b:if cond='data:blog.pageType == "item"'>
<div class='breadcrumbs'>
Browse » <a expr:href='data:blog.homepageUrl' rel='tag'>Home</a>
<b:loop values='data:posts' var='post'>
<b:if cond='data:post.labels'>
<b:loop values='data:post.labels' var='label'>
<b:if cond='data:label.isLast == "true"'> »
<a expr:href='data:label.url' rel='tag'><data:label.name/></a>
</b:if>
» <span><data:post.title/></span>
</b:loop>
</b:if>
</b:loop>
</div>
</b:if>
<b:else/>
<b:if cond='data:blog.pageType == "archive"'>
<div class='breadcrumbs'>
Browse » <a expr:href='data:blog.homepageUrl'>Home</a> » Archives for <data:blog.pageName/>
</div>
</b:if>
<b:else/>
<b:if cond='data:navMessage'>
<div class='breadcrumbs'>
<data:navMessage/>
</div>
</b:if>
</b:if> - Click Save Template button
- Wait for a while until your template saved
- Open your blog, click the title of an article, see the result
- Finished.
If your steps are correct, the “breadcrumb-navigation” will look as shown above..
Below are some characters and their entities.


